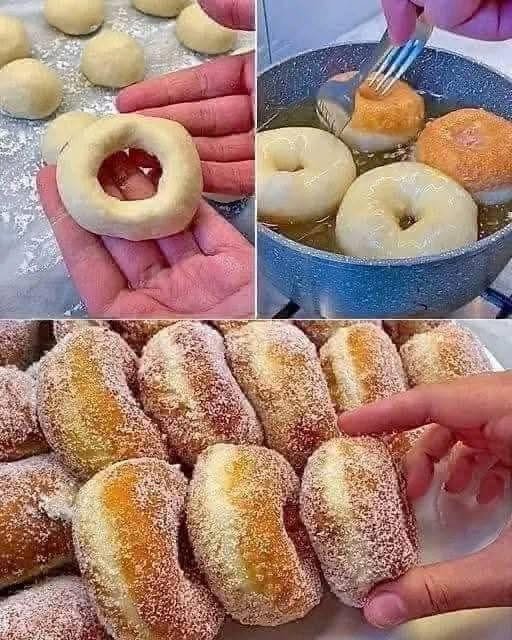
🍩✨ Homemade Glazed Doughnuts — Soft, Fluffy and Better Than the Doughnut Shop! 😊😍
There is nothing quite like biting into a warm homemade doughnut with a soft, pillowy center and a sweet vanilla glaze that melts into every golden curve.
These classic homemade glazed doughnuts are light, fluffy, buttery, and surprisingly easy to make with simple pantry ingredients. They take a little time because the dough needs to rise, but that first warm bite makes every minute worth it.
Serve them for weekend breakfast, Sunday brunch, birthdays, holiday mornings, family gatherings, or anytime you want to turn an ordinary day into something special.
And yes—these taste just like the fresh glazed doughnuts everyone reaches for first at the bakery!
⏱️ Prep Time: 25 minutes
⏳ Rising Time: 1 hour 30 minutes
🔥 Cook Time: 20 minutes
🕒 Total Time: About 2 hours 15 minutes
🍩 Yield: 12 doughnuts plus doughnut holes
Ingredients
For the Doughnuts
- ¾ cup whole milk, warmed to 105–110°F
- 2¼ teaspoons active dry yeast, one standard packet
- ¼ cup granulated sugar, divided
- 2 large eggs, room temperature
- 6 tablespoons unsalted butter, melted and slightly cooled
- 1 teaspoon vanilla extract
- ½ teaspoon salt
- 3½–4 cups all-purpose flour
- 6–8 cups vegetable, canola, or peanut oil, for frying
For the Vanilla Glaze
- 2 cups powdered sugar
- ¼ cup whole milk
- 1 teaspoon vanilla extract
- A small pinch of salt
Optional Toppings
- Rainbow sprinkles
- Chocolate sprinkles
- Cinnamon sugar
- Crushed cookies
- Chopped nuts
- Toasted coconut
- Mini chocolate chips
- Colored icing
Instructions
1. Activate the Yeast
Pour the warm milk into a large mixing bowl.
Add the yeast and 1 tablespoon of the granulated sugar. Stir gently and let the mixture sit for approximately 5–10 minutes.
The yeast mixture should become foamy on top.
When it does not foam, the milk may have been too hot, too cold, or the yeast may no longer be active. Start again with fresh yeast for the best rise.
The ideal milk temperature is between 105°F and 110°F. Milk that is too hot can kill the yeast.
2. Mix the Wet Ingredients
Once the yeast is foamy, add the remaining sugar, eggs, melted butter, vanilla extract, and salt.
Whisk until everything is well combined.
Make sure the melted butter has cooled slightly before adding it so it does not overheat the yeast or partially cook the eggs.
3. Add the Flour
Add 3½ cups of flour, one cup at a time, mixing after each addition.
When using a stand mixer, attach the dough hook and mix on low speed.
When mixing by hand, use a sturdy wooden spoon until the dough becomes too thick, then continue kneading with your hands.
Add additional flour, one tablespoon at a time, only when needed.
The dough should be soft, smooth, and slightly tacky. Avoid adding too much flour, as this can make the finished doughnuts dense or dry.
4. Knead the Dough
Knead the dough with a stand mixer on medium-low speed for approximately 5–7 minutes.
When kneading by hand, transfer the dough to a lightly floured surface and knead for approximately 8–10 minutes.
The dough is ready when it feels smooth and elastic and springs back slowly when gently pressed with a finger.
5. Let the Dough Rise
Lightly grease a large bowl with oil or cooking spray.
Place the dough in the bowl and turn it once so the surface is lightly coated.
Cover the bowl with plastic wrap or a clean kitchen towel.
Let the dough rise in a warm, draft-free place for approximately 60–90 minutes, or until it has doubled in size.
A slightly warm oven that is turned off can be a good place for dough to rise.
6. Roll Out the Dough
Gently press down the risen dough to release excess air.
Transfer it to a lightly floured work surface.
Roll the dough into a large circle or rectangle approximately ½ inch thick.
Avoid rolling it too thin. Thick dough creates soft, fluffy doughnuts, while dough that is too thin may become flat or overly crisp.
7. Cut the Doughnuts
Use a 3-inch doughnut cutter to cut the dough.
When you do not have a doughnut cutter, use a round drinking glass or biscuit cutter for the outer circle and a small bottle cap or piping tip for the center.
Place the doughnuts and doughnut holes on parchment-lined baking sheets.
Gather the scraps gently, let them rest for 5 minutes, then reroll and cut more doughnuts.
Try not to reroll the dough too many times because overworking it can make the final doughnuts less tender.
8. Let the Doughnuts Rise Again
Cover the cut doughnuts loosely with clean kitchen towels.
Let them rise for another 30–45 minutes, or until they look soft and puffy.
Do not skip the second rise. This step gives the doughnuts their light, airy texture.
9. Prepare the Frying Oil
Pour the oil into a heavy-bottomed pot or Dutch oven.
The oil should be approximately 2–3 inches deep.
Heat it over medium heat until it reaches 350°F.
Use a deep-fry or candy thermometer for the most accurate temperature.
Keeping the oil at the correct temperature is one of the most important parts of making doughnuts.
- Oil that is too cool will make the doughnuts greasy.
- Oil that is too hot will brown the outside before the center is cooked.
10. Fry the Doughnuts
Carefully lower 2–3 doughnuts into the hot oil.
Do not overcrowd the pot, as this can lower the oil temperature.
Fry for approximately 45–60 seconds per side, or until each side is golden brown.
Use a slotted spoon or spider strainer to turn the doughnuts carefully.
Doughnut holes may cook more quickly, usually within 30–45 seconds per side.
11. Drain the Doughnuts
Transfer the fried doughnuts to a wire cooling rack placed over a baking sheet.
You can also place them briefly on paper towels, but a wire rack helps prevent the bottoms from becoming soggy.
Allow the doughnuts to cool for approximately 5–10 minutes before glazing.
They should still be warm, but not so hot that the glaze completely melts off.
How to Make the Vanilla Glaze
In a medium bowl, whisk together the powdered sugar, milk, vanilla extract, and salt.
Continue whisking until the glaze is smooth and free of lumps.
The glaze should be thick enough to coat the doughnuts but thin enough to drip slowly.
When the glaze is too thick, add additional milk one teaspoon at a time.
When it is too thin, add more powdered sugar.
How to Glaze the Doughnuts
Dip one side of each warm doughnut into the glaze.
Lift it out and allow the excess glaze to drip back into the bowl.
Place the glazed doughnuts on a wire rack.
For fully glazed doughnuts, dip both sides.
Add sprinkles or other toppings immediately before the glaze begins to set.
Allow the doughnuts to rest for approximately 10–15 minutes before serving.
Chocolate Glaze Variation
Ingredients
- 1½ cups powdered sugar
- ¼ cup unsweetened cocoa powder
- 3–4 tablespoons whole milk
- 1 teaspoon vanilla extract
- 1 tablespoon melted butter
- A pinch of salt
Instructions
Whisk all ingredients together until smooth.
Add milk one teaspoon at a time until the glaze reaches the desired consistency.
Dip the cooled doughnuts and top with sprinkles, chopped nuts, or mini chocolate chips.
Cinnamon Sugar Doughnuts
Combine:
- ¾ cup granulated sugar
- 1½ tablespoons ground cinnamon
Toss the warm doughnuts in the cinnamon sugar mixture shortly after frying.
The doughnuts should still be slightly warm so the sugar sticks well.
For even better coverage, lightly brush them with melted butter before coating.
Powdered Sugar Doughnuts
Place 1 cup of powdered sugar in a large resealable food-storage bag.
Add one warm doughnut at a time and gently shake until coated.
Let the doughnuts cool slightly first so the powdered sugar does not completely dissolve.
Maple Glaze Variation
Combine:
- 2 cups powdered sugar
- ¼ cup pure maple syrup
- 2–3 tablespoons milk
- ½ teaspoon vanilla extract
- A pinch of salt
Whisk until smooth.
Dip the doughnuts and top with chopped pecans or cooked crumbled bacon for a sweet-and-salty version.
Strawberry Glaze Variation
Combine:
- 2 cups powdered sugar
- 3 tablespoons strawberry puree
- 1 tablespoon milk
- ½ teaspoon vanilla extract
Whisk until smooth.
Add additional powdered sugar when the glaze is too thin.
Top with freeze-dried strawberry pieces or rainbow sprinkles.
Filled Doughnut Variation
Instead of cutting holes in the dough, cut full 3-inch circles.
Let them rise and fry as directed.
Once cooled slightly, use a piping bag fitted with a filling tip to add:
- Vanilla pastry cream
- Chocolate custard
- Strawberry jam
- Raspberry preserves
- Lemon curd
- Nutella
- Whipped cream
Do not overfill the doughnuts, as the filling may burst through the sides.
Dust with powdered sugar or dip the tops in glaze.
Tips for Soft, Fluffy Doughnuts
✅ Check the yeast: The yeast should foam before you continue.
✅ Use warm, not hot, milk: Hot liquid can kill the yeast.
✅ Do not add too much flour: The dough should remain soft and slightly tacky.
✅ Let the dough rise fully: Under-risen doughnuts may be dense.
✅ Keep the oil at 350°F: Temperature control prevents greasy or undercooked doughnuts.
✅ Fry in small batches: Crowding the pot lowers the oil temperature.
✅ Do not fry too long: Doughnuts cook quickly and can dry out.
✅ Glaze while slightly warm: Warm doughnuts help the glaze settle into a smooth coating.
✅ Serve them fresh: Homemade doughnuts taste best on the same day.
Why Are My Doughnuts Greasy?
Doughnuts usually become greasy when:
- The oil temperature is too low
- Too many doughnuts are added at once
- The doughnuts are fried for too long
- The dough did not rise enough
Allow the oil to return to 350°F between batches.
Why Are My Doughnuts Dense?
Dense doughnuts can result from:
- Adding too much flour
- Using expired yeast
- Not kneading the dough enough
- Skipping or shortening the rising time
- Rolling the dough too thin
- Adding flour too aggressively during shaping
Use the smallest amount of flour needed to handle the dough.
Why Are My Doughnuts Raw in the Center?
The oil may be too hot.
When the oil is above the recommended temperature, the exterior browns before the inside has time to cook.
Reduce the heat and test one doughnut before frying the full batch.
Baked Doughnut Option
These yeast doughnuts can also be baked, although the texture will be slightly more like a soft breakfast roll than a traditional fried doughnut.
Preheat the oven to 375°F.
Place the risen doughnuts on parchment-lined baking sheets.
Brush the tops lightly with melted butter.
Bake for approximately 9–12 minutes, or until lightly golden.
Brush again with melted butter and add glaze or cinnamon sugar.
Air Fryer Doughnut Option
Preheat the air fryer to 350°F.
Lightly spray the basket and the risen doughnuts with cooking spray.
Arrange them in a single layer with space between each one.
Air-fry for approximately 4–6 minutes, turning once when needed.
Brush with melted butter before glazing or coating with cinnamon sugar.
Air fryer models vary, so check the first batch early.
Make-Ahead Instructions
Prepare the dough the night before and complete the first rise.
Cover the bowl tightly and refrigerate the dough overnight.
The next morning, let it sit at room temperature for approximately 20–30 minutes.
Roll, cut, rise again, and fry as directed.
You can also cut the doughnuts the night before, arrange them on parchment-lined baking sheets, cover tightly, and refrigerate.
Allow them to come closer to room temperature and become puffy before frying.
How to Store Homemade Doughnuts
Homemade doughnuts taste best within several hours of frying.
Store leftovers in a loosely covered container at room temperature for up to 2 days.
Do not seal warm doughnuts in an airtight container, as trapped steam can make them soggy.
Refrigeration can dry them out, but filled doughnuts containing custard, cream, or dairy-based fillings must be refrigerated.
How to Reheat Doughnuts
Microwave one doughnut for approximately 8–12 seconds.
You can also warm unglazed doughnuts in a 300°F oven for 5–7 minutes.
Avoid overheating them, as they can become tough.
Can You Freeze Doughnuts?
Yes.
Freeze unglazed doughnuts for the best results.
Allow them to cool completely, then place them in a freezer-safe bag or airtight container.
Freeze for up to 2 months.
Thaw at room temperature, warm briefly, and glaze before serving.
Glazed doughnuts can also be frozen, but the glaze may look slightly different after thawing.
What to Serve with Homemade Doughnuts
Serve them with:
- Freshly brewed coffee
- Iced coffee
- Hot chocolate
- Cold milk
- Chai tea
- Fresh fruit
- Scrambled eggs
- Breakfast sausage
- Bacon
- Yogurt parfaits
- Breakfast casseroles
- Fresh berries
They are perfect for brunch boards, birthday breakfasts, baby showers, school celebrations, family gatherings, and holiday mornings.
Doughnut Decorating Ideas
Create a fun doughnut bar with bowls of:
- Rainbow sprinkles
- Mini chocolate chips
- Crushed cookies
- Chopped peanuts
- Toasted coconut
- Cinnamon sugar
- Fruity cereal
- Crumbled bacon
- Chocolate sauce
- Caramel sauce
- Fresh berries
Let everyone dip and decorate their own doughnuts.
Why You’ll Love This Recipe
🍩 Soft and fluffy inside
✨ Sweet, shiny vanilla glaze
🔥 Fresh from your own kitchen
🎉 Perfect for parties and brunch
👨👩👧👦 Fun to make with family
🍫 Easy to customize with different flavors
🧊 Freezer-friendly
😍 Better than store-bought
These homemade doughnuts are golden, warm, sweet, and incredibly satisfying.
The moment you dip one into the vanilla glaze and take that first soft, fluffy bite, you will understand why homemade is always worth it!
📌 Save this recipe for your next weekend breakfast or family brunch!
👇 Which doughnut would you choose first—classic glazed, chocolate, cinnamon sugar, maple, strawberry, or cream-filled? Tell us in the comments! 🍩❤️
#HomemadeDoughnuts #GlazedDoughnuts #DonutRecipe #BreakfastRecipes #BrunchIdeas #SweetTreats #HomemadeDesserts #BakingFromScratch #FamilyRecipes #WeekendBreakfast #ClassicRecipes #DessertIdeas #ComfortFood #EasyBaking #RecipeOfTheDay