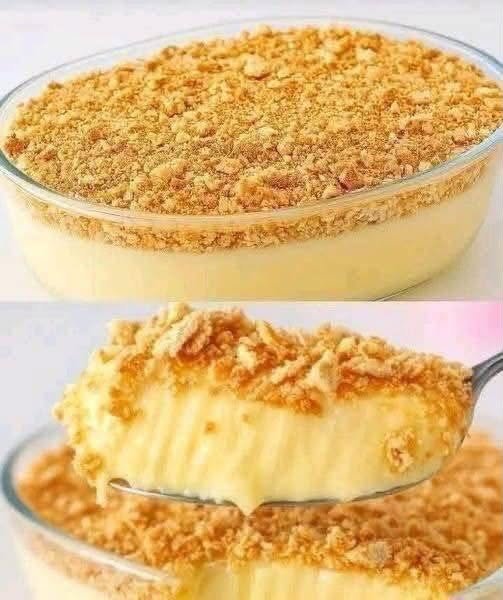
🍋✨ Creamy 3-Ingredient Dessert — Silky Lemon Posset with No Eggs or Gelatin!
Can three simple ingredients really become an elegant, creamy dessert?
Absolutely!
This Creamy 3-Ingredient Lemon Dessert, also known as lemon posset, is smooth, rich, bright, and incredibly easy to prepare.
All you need is heavy cream, sugar, and fresh lemon juice. There are no eggs, no gelatin, no cream cheese, and no complicated baking techniques.
The mixture gently thickens as it chills, creating a silky spoonable dessert that tastes elegant enough for dinner parties but is simple enough for beginners.
Serve it in small glasses with berries, whipped cream, or crushed cookies for a beautiful make-ahead treat.
⏱️ Prep Time: 5 minutes
🔥 Cook Time: 8 minutes
🧊 Chilling Time: At least 4 hours
🕒 Total Time: About 4 hours 15 minutes
🍽️ Servings: 6 small desserts
Ingredients
- 2 cups heavy whipping cream
- ⅔ cup granulated sugar
- ⅓ cup fresh lemon juice
Optional Toppings
These do not count toward the basic three-ingredient recipe:
- Fresh strawberries
- Blueberries
- Raspberries
- Lemon zest
- Whipped cream
- Crushed graham crackers
- Shortbread cookies
- Mint leaves
- Toasted coconut
Instructions
1. Juice the Lemons
Roll the lemons firmly over the countertop to help release more juice.
Cut and squeeze them through a fine-mesh strainer to remove the seeds.
Measure exactly ⅓ cup of fresh lemon juice.
Freshly squeezed juice provides the best flavor and acidity for setting the dessert.
2. Combine Cream and Sugar
Pour the heavy whipping cream into a medium, heavy-bottomed saucepan.
Add the granulated sugar.
Place the pan over medium heat.
Stir gently until the sugar dissolves.
3. Bring to a Gentle Boil
Allow the cream mixture to come to a gentle boil.
Once it begins bubbling, reduce the heat slightly and boil gently for approximately 3 minutes, stirring frequently.
Do not walk away. Cream can rise quickly and boil over.
The mixture should bubble steadily without scorching on the bottom.
4. Remove from the Heat
Take the saucepan off the burner.
Allow the cream to cool for approximately 2 minutes.
5. Add the Lemon Juice
Slowly pour in the fresh lemon juice while whisking gently.
The mixture may begin thickening slightly almost immediately.
Continue whisking until smooth and evenly blended.
6. Strain for a Silky Texture
For the smoothest result, pour the mixture through a fine-mesh strainer into a clean measuring cup or bowl.
This removes any cooked cream particles or lemon pulp.
7. Divide into Serving Glasses
Pour the mixture into six small dessert glasses, ramekins, jars, or teacups.
Because the dessert is rich, small portions are ideal.
8. Cool Briefly
Let the desserts sit at room temperature for approximately 20–30 minutes.
Do not cover them while they are still hot, as trapped condensation can drip onto the surface.
9. Refrigerate Until Set
Cover the serving glasses and refrigerate for at least 4 hours.
Overnight chilling produces the firmest, creamiest texture.
The dessert should be set around the edges and softly creamy in the center.
10. Garnish and Serve
Add fresh berries, lemon zest, mint, whipped cream, or cookie crumbs immediately before serving.
Serve cold.
Why Does It Set Without Gelatin?
The acidity of the lemon reacts with the proteins in the heated cream, allowing the mixture to thicken as it cools.
For that reason, proper measurements and fresh lemon juice are important.
Tips for the Best Result
✅ Use heavy whipping cream, not milk or half-and-half.
✅ Measure the lemon juice accurately.
✅ Let the cream boil gently for the full recommended time.
✅ Stir frequently to prevent scorching.
✅ Use fresh lemon juice for reliable flavor and acidity.
✅ Chill for at least four hours.
✅ Serve in small portions because the dessert is rich.
Strawberry Lemon Version
Top each chilled dessert with diced strawberries mixed with a teaspoon of sugar.
Let the berries sit for 10 minutes before spooning them over the posset.
Raspberry Version
Replace 1 tablespoon of the lemon juice with strained raspberry puree.
Keep enough lemon juice in the recipe to help the dessert set.
Lime Posset
Replace the lemon juice with fresh lime juice.
Garnish with lime zest and toasted coconut.
Orange-Lemon Version
Use:
- ¼ cup lemon juice
- 1 tablespoon orange juice
- Finely grated orange zest for garnish
Do not replace all the lemon juice with orange juice because orange is generally less acidic.
Cookie-Crust Dessert Cups
Place 1–2 tablespoons crushed graham crackers or shortbread cookies in the bottom of each serving glass.
Pour the warm lemon mixture over the crumbs.
Chill as directed.
Why Did My Dessert Not Set?
Possible reasons include:
- The cream was not boiled long enough
- Too little lemon juice was used
- Half-and-half or milk replaced heavy cream
- The dessert was not chilled long enough
- The quantities were changed significantly
Return a very soft mixture to the refrigerator overnight before deciding it has failed.
Make-Ahead Instructions
Prepare the dessert up to 2 days ahead.
Cover each glass and refrigerate.
Wait until shortly before serving to add berries, cookies, or mint.
Storage Instructions
Keep the dessert covered in the refrigerator.
Use within 3 days.
Do not leave it at room temperature for more than 2 hours.
Can You Freeze It?
Freezing is not recommended because the creamy texture may become grainy after thawing.
This easy Creamy 3-Ingredient Dessert tastes like something from an elegant restaurant, yet it requires only a saucepan and a few minutes of active preparation!
📌 Save this recipe for your next dinner party or last-minute dessert craving.
👇 Would you top yours with strawberries, raspberries, cookies, or whipped cream?
#ThreeIngredientDessert #LemonPosset #CreamyDessert #EasyDessertRecipe #NoBakeDessert #LemonDessert #MakeAheadDessert #SimpleRecipes #DinnerPartyDessert #SummerDesserts #HomemadeDessert #QuickDesserts #DessertIdeas #SweetTreats #RecipeOfTheDay
━━━━━━━━━━━━━━━━━━━━━━
4. TITLE
Strawberry Upside Down Cake
FACEBOOK DESCRIPTION
🍓🍰 Strawberry Upside Down Cake — Juicy Berries, Buttery Cake and a Beautiful Surprise on Top!
This Strawberry Upside Down Cake begins with sweet strawberries arranged beneath a soft, buttery vanilla cake.
As it bakes, the berries release their juices and create a glossy, jam-like topping. Once the cake is flipped, the hidden strawberry layer becomes the star of the dessert.
It is colorful, moist, easy to prepare, and perfect for spring gatherings, summer cookouts, Mother’s Day, Easter, birthdays, potlucks, or Sunday dessert.
⏱️ Prep Time: 20 minutes
🔥 Bake Time: 40–45 minutes
❄️ Cooling Time: 15 minutes
🕒 Total Time: About 1 hour 20 minutes
🍽️ Servings: 8–10
🍰 Pan Size: 9-inch round cake pan
Ingredients
For the Strawberry Topping
- 3 tablespoons unsalted butter, melted
- ½ cup packed light brown sugar
- 2 cups fresh strawberries, hulled and sliced
- 1 teaspoon fresh lemon juice
- 1 teaspoon cornstarch
For the Vanilla Cake
- 1½ cups all-purpose flour
- 1½ teaspoons baking powder
- ¼ teaspoon baking soda
- ½ teaspoon kosher salt
- ½ cup unsalted butter, softened
- ¾ cup granulated sugar
- 2 large eggs, room temperature
- 2 teaspoons vanilla extract
- ½ cup sour cream
- ¼ cup whole milk
Instructions
1. Prepare the Oven and Pan
Preheat the oven to 350°F.
Grease a 9-inch round cake pan.
Line the bottom with parchment paper and lightly grease the parchment.
Place the pan on a rimmed baking sheet to catch any possible drips.
2. Prepare the Strawberries
Wash the strawberries and dry them thoroughly.
Remove the stems and slice the berries evenly.
Toss them with lemon juice and cornstarch.
The cornstarch helps thicken the berry juices while the cake bakes.
3. Make the Brown Sugar Base
Pour the melted butter into the prepared pan.
Sprinkle the brown sugar evenly over the butter.
Arrange the strawberry slices over the sugar in an even layer.
A decorative pattern is optional because the berries will soften and shift slightly during baking.
4. Combine the Dry Ingredients
In a medium bowl, whisk together:
- Flour
- Baking powder
- Baking soda
- Salt
Set aside.
5. Cream the Butter and Sugar
In a large bowl, beat the softened butter and granulated sugar for approximately 2–3 minutes.
The mixture should look pale and fluffy.
6. Add the Eggs and Vanilla
Add the eggs one at a time, beating well after each addition.
Mix in the vanilla extract.
Scrape the sides and bottom of the bowl.
7. Add Sour Cream and Dry Ingredients
Mix in the sour cream.
Add the flour mixture in three additions, alternating with the milk.
Begin and end with the flour mixture.
Mix only until combined.
Avoid overmixing, which can make the cake dense.
8. Add the Batter to the Pan
Spoon the batter carefully over the strawberries.
Spread it gently to the edges without disturbing the fruit layer.
Smooth the top.
9. Bake
Bake for 40–45 minutes.
The cake is ready when a toothpick inserted into the center comes out clean or with a few moist crumbs.
When the top browns too quickly, cover it loosely with foil during the final minutes.
10. Cool Briefly
Let the cake cool in the pan for exactly 10–15 minutes.
Do not let it cool completely in the pan because the caramelized fruit layer may begin sticking.
11. Flip the Cake
Run a thin knife around the edge.
Place a serving plate upside down over the pan.
Using oven mitts, hold the plate and pan together and flip them in one confident motion.
Lift the pan carefully.
Replace any strawberries that remain in the pan.
12. Serve
Let the cake cool slightly before slicing.
Serve warm or at room temperature with whipped cream, vanilla ice cream, or fresh strawberries.
Tips for the Best Cake
✅ Dry the strawberries thoroughly.
✅ Slice the fruit evenly.
✅ Use parchment paper for easier release.
✅ Do not overmix the batter.
✅ Flip the cake after 10–15 minutes.
✅ Use a serving plate larger than the cake pan.
Frozen Strawberry Option
Frozen berries can release significantly more moisture.
Thaw them completely, drain well, and pat dry before using.
Fresh strawberries generally produce the best appearance and texture.
Strawberry-Rhubarb Variation
Replace ½ cup strawberries with ½ cup thinly sliced rhubarb.
Add an extra tablespoon of brown sugar to balance the tartness.
Strawberry-Lemon Variation
Add 1 tablespoon finely grated lemon zest to the cake batter.
Strawberry-Chocolate Variation
Add ½ cup mini chocolate chips to the batter.
Storage Instructions
Cover and refrigerate leftovers for up to 3 days.
Let each slice come closer to room temperature or warm it briefly before serving.
Can You Freeze It?
Freeze individual slices for up to 2 months.
Thaw them overnight in the refrigerator.
The strawberry topping may become slightly softer after freezing.
This beautiful Strawberry Upside Down Cake is fruity, buttery, moist, and guaranteed to brighten any dessert table!
📌 Save this recipe for strawberry season.
👇 Would you serve yours with whipped cream or vanilla ice cream?
#StrawberryCake #UpsideDownCake #StrawberryDessert #FreshStrawberries #SummerDesserts #EasyCakeRecipe #HomemadeCake #FruitDesserts #SpringDesserts #PotluckDesserts #BakingFromScratch #FamilyRecipes #DessertIdeas #CakeLovers #RecipeOfTheDay
━━━━━━━━━━━━━━━━━━━━━━
5. TITLE
Husband Cake
FACEBOOK DESCRIPTION
🍅🍰 Husband Cake — An Old-Fashioned Tomato Soup Spice Cake That Tastes Surprisingly Delicious!
Yes, you read that correctly—this old-fashioned cake is made with condensed tomato soup!
Before you scroll away, the tomato flavor disappears during baking and leaves behind an incredibly moist spice cake filled with cinnamon, cloves, nutmeg, raisins, and crunchy walnuts.
Often called Husband Cake or tomato soup cake, this unusual vintage dessert has the warm, cozy flavor of carrot cake, pumpkin bread, or applesauce cake.
The tomato soup adds moisture, color, and subtle richness without making the finished cake taste like tomatoes.
Top it with cream cheese frosting, dust it with powdered sugar, or serve it warm with coffee for an unforgettable conversation-starting dessert.
⏱️ Prep Time: 20 minutes
🔥 Bake Time: 45–55 minutes
❄️ Cooling Time: 1 hour
🕒 Total Time: About 2 hours 15 minutes
🍽️ Servings: 12
🍰 Pan Size: 9-by-13-inch baking pan
Ingredients
For the Cake
- 2½ cups all-purpose flour
- 2 teaspoons baking powder
- 1 teaspoon baking soda
- 1 tablespoon ground cinnamon
- 1 teaspoon ground nutmeg
- ½ teaspoon ground cloves
- ½ teaspoon kosher salt
- ½ cup unsalted butter, softened
- 1¼ cups packed light brown sugar
- 2 large eggs, room temperature
- 1 can condensed tomato soup, approximately 10.5 ounces
- ½ cup water
- 1 teaspoon vanilla extract
- 1 cup raisins
- 1 cup chopped walnuts or pecans
For the Cream Cheese Frosting
- 8 ounces full-fat block cream cheese, softened
- ½ cup unsalted butter, softened
- 3 cups powdered sugar
- 1 teaspoon vanilla extract
- A pinch of salt
- 1–2 tablespoons milk or heavy cream, if needed
Instructions
1. Prepare the Oven and Pan
Preheat the oven to 350°F.
Grease a 9-by-13-inch baking pan.
Line it with parchment paper when you want to lift the cake out before slicing.
2. Prepare the Raisins
Place the raisins in a small bowl.
Cover them with warm water and let them soak for approximately 10 minutes.
Drain and pat them dry.
This helps prevent the raisins from becoming hard during baking.
3. Combine the Dry Ingredients
In a medium bowl, whisk together:
- Flour
- Baking powder
- Baking soda
- Cinnamon
- Nutmeg
- Cloves
- Salt
Set aside.
4. Cream the Butter and Sugar
Place the softened butter and brown sugar in a large bowl.
Beat with an electric mixer for approximately 2–3 minutes, or until lighter and fluffy.
5. Add the Eggs
Add the eggs one at a time.
Beat well after each addition.
Mix in the vanilla.
6. Combine the Soup and Water
In a separate bowl or measuring cup, whisk the condensed tomato soup with the water until smooth.
Do not prepare the soup according to the can directions. Use only the amount of water listed in this cake recipe.
7. Add the Soup and Flour
Add approximately one-third of the flour mixture to the butter mixture.
Mix briefly.
Add half of the tomato soup mixture.
Continue alternating the dry and liquid ingredients, beginning and ending with the flour.
Mix only until combined.
8. Add Raisins and Nuts
Fold in the drained raisins and chopped walnuts or pecans.
Do not overmix.
9. Bake
Spread the batter evenly in the prepared pan.
Bake for approximately 45–55 minutes.
The cake is ready when a toothpick inserted into the center comes out clean or with a few moist crumbs.
10. Cool Completely
Let the cake cool in the pan for approximately 15 minutes.
Transfer it to a wire rack when desired, or leave it in the pan.
Cool completely before frosting.
Make the Cream Cheese Frosting
Beat the softened cream cheese and butter until smooth.
Add the powdered sugar one cup at a time.
Mix in the vanilla and salt.
Add milk or cream one teaspoon at a time when the frosting is too thick.
Spread over the completely cooled cake.
Why Does Tomato Soup Work in Cake?
Condensed tomato soup contributes moisture, mild acidity, and color.
Once combined with sugar and warm spices, the savory tomato flavor becomes extremely subtle.
Do not add garlic, herbs, or prepared tomato soup—use plain condensed tomato soup.
Tips for Success
✅ Use plain condensed tomato soup.
✅ Do not prepare the soup according to the label.
✅ Measure the flour correctly.
✅ Soak and drain the raisins.
✅ Toast the nuts for deeper flavor.
✅ Avoid overmixing.
✅ Cool completely before frosting.
Optional Additions
Try adding:
- ½ cup shredded carrots
- ½ cup sweetened coconut
- 1 tablespoon orange zest
- ½ cup chopped dates
- ½ teaspoon ground ginger
Bundt Cake Instructions
Grease and flour a 10- to 12-cup Bundt pan thoroughly.
Bake at 350°F for approximately 45–55 minutes.
Cool for 15 minutes before turning it out.
Drizzle with a simple vanilla glaze instead of cream cheese frosting.
Simple Vanilla Glaze
Combine:
- 1½ cups powdered sugar
- 2–3 tablespoons milk
- ½ teaspoon vanilla extract
Whisk until smooth and drizzle over the cooled cake.
Storage Instructions
When unfrosted, store the cake covered at room temperature for up to 2 days.
When topped with cream cheese frosting, cover and refrigerate it for up to 5 days.
Let refrigerated slices sit at room temperature briefly before serving.
Can You Freeze Husband Cake?
Yes.
Wrap unfrosted cake tightly and freeze for up to 3 months.
Thaw overnight in the refrigerator and frost before serving.
This unusual Husband Cake is moist, warmly spiced, nostalgic, and much more delicious than its surprising ingredient list suggests!
📌 Save this vintage recipe and see whether your family can guess the secret ingredient.
👇 Would you try tomato soup in a spice cake? Be honest in the comments!
#HusbandCake #TomatoSoupCake #VintageRecipes #OldFashionedCake #SpiceCake #DepressionEraRecipes #HomemadeCake #CreamCheeseFrosting #FamilyRecipes #ClassicDesserts #BakingFromScratch #UniqueRecipes #ComfortFood #CakeRecipe #RecipeOfTheDay